Sunshine! Spring is showing its face here in the Pacific NorthWest, and it is far too warm to resist the urge to make salad, today. I’ve made variations of this salad over the last year, but I’ve finally come to the conclusion that less is more when it comes to the dressing for this flag-bearer of a salad. Here we have the quintessential SouthWestern ingredients, all dressed in little more than the sharp floral flavors of fresh squeezed lime. If you love avocado the way we do, add an additional one (in cubes) to the salad before using the final one to decorate the top. I’ve not given a quantity for the chili, as different chilis have such a variation in heat, and different people have such a variation in desire for heat. You should add enough chili to just feel the heat, here, but not overpower all the other flavors. I’ve been using 1-3 tsp of minced, fresh/frozen Hatch chilis, which seems to be about right for my family.
Serves 4 as a main course salad or 8 as a side
1 cup frozen sweet corn, defrosted
2 14oz tins of black beans, drained
minced fresh chili, to taste
2 spring onions, cleaned
7-8 small red/yellow/orange bell peppers
3 salad tomatoes
1/4 cup fresh cilantro
juice of 1/2 a fresh lime (or more, to taste)
1 small head cos/romaine lettuce
1 large avocado (or 2, if your budget copes with it)
Mix the corn and black beans together in a large bowl.
Stir the minced chili into the beans.
Slice the spring onions on the diagonal into 1/2″ pieces, and the bell peppers, and tomatoes into cubes.
Mix these into the corn and beans, stir in the chopped cilantro, and dress with the lime juice.
Rip the bigger leaves of the cos/romain lettuce into bite-sized pieces and form all the lettuce into a bed in a large (or individual) bowl/s.
Pile the bean mixture onto the lettuce bed, decorate with the avocado, and squeeze some additional lime over the top, if desired.
Serve as is, or with tortilla chips or in GF tortilla shells.
This recipe was updated Feb 28, 2020 to reflect how I make it with dried beans. The previous version follows at the bottom of the page.
Cassoulet is a classic comfort food from France: a thick, bean-y stew which clings to your ribs. I had it as a pre-vegetarian teenager, when we vacationed there years and years ago, and was so enamored of it, that when I turned vegetarian, I wanted to retain the ability to eat it.
When I first devised this veganized and simplified version, I was still eating wheat, and instead of tofu, I used 4 large spiced veggie sausages which were utterly yummy here, but much to my frustration were wiped off my menu when I realized I had to ditch the wheat. It took me a fair few years to get around to figuring this gluten free version.
Now, I should point out that ‘normal’ cassoulet not only has meat in it, it also has everything cooked together for quite a long time to cook the beans, tenderize the meat, and form a rich tasting crust which forms due to all the meat fat floating on the surface. We don’t have all that fat here, and tofu isn’t going to be improved by a long slow cook in bean juices: it’s quite tender enough, and if anything, it needs to be firmed up, which is why I grill/broil mine first.
Serves 3-4 people
For the beans:
1 tsp oil or margarine
1/2 large (or 1 medium) onion, coarsely diced
2 cloves garlic
1 cup (6 oz) dried great northern, haricot/navy, or other small white bean, picked over for debris andsoaked overnight, or quick soaked by pouring boiling water over, and leaving for an hour.
1 bay leaf
1 tsp dried thyme
1 tsp dried rosemary
1/4 tsp pepper
1 tsp salt (or to taste – don’t add until after the beans have cooked)
For the tofu:
1 tsp salt
1 tbsp nutritional yeast
1 tsp garlic powder
1 tsp onion powder
1/4 tsp pepper
dash of cayenne pepper (optional)
1 tsp oil
14-16 oz firm tofu (regular, not silken), drained
Heat the oil for the beans in a saucepan or pressure cooker pan, and fry the diced onion over medium heat until medium brown (~10-15 minutes).
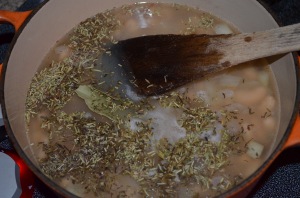
Add the beans and bean seasonings (garlic, bay leaf, thyme, rosemary, pepper) and 1 1/4 cups (10 floz) water to the onion. If you’re using a pressure cooker or Instant Pot, bring this up to pressure for 12 minutes, then allow to come down from pressure naturally. If using a regular saucepan, cover tightly and simmer for ~1 hour until the beans are soft, but still hold their shape. Add more water and time as necessary. (Don’t add the salt for the beans until after you’re sure they’re cooked to the required texture.)
Cut the tofu into 3/4″ cubes or chipolata, and put to one side to drain for a few minutes.
In a large bowl, stir together the tofu seasonings (salt, nutritional yeast, garlic powder, onion powder, pepper, and chili if desired).
Grease a cookie sheet/baking tray with the oil for the tofu.
Pat dry the tofu with kitchen paper, and use your hands to toss the tofu gently with the seasoning mixture.
Spread the tofu out on the baking/cookie sheet, and place about 6″ under a hot grill/broiler for about 10 minutes until starting to firm up around the edges and sizzle. Stir and turn over the tofu occasionally to prevent sticking.
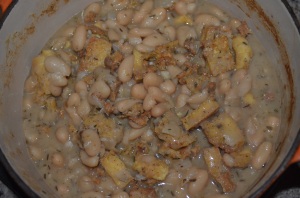
When the tofu is ready (firmed up on the outside and chewy), stir it into the beans.
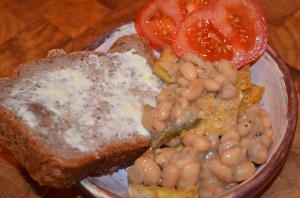
Serve hot with crusty GF bread or freshly cooked tortillas, a salad, and warm fluffy blankets next to a roaring fire.
The following is the previous recipe I used to make cassoulet.
The tofu can either be fresh, or frozen and defrosted before use. Defrosted tofu has a different texture to that of fresh which releases its water more easily, and may well have a more acceptable texture for those folks who don’t normally eat tofu.
Serves 3-4 people
2 tsp oil or margarine
1/2 large (or 1 medium) onion, coarsely diced
2 cloves garlic
2 cans great northern, haricot/navy, or other small white beans (not drained)
1 bay leaf
1 tsp dried thyme
1 tsp dried rosemary
1/4 tsp pepper
salt to taste (depends on how salty your cooked beans are)
~14 oz firm tofu (regular, not silken), drained
1 tsp salt
1 tbsp nutritional yeast
1/2 tsp garlic powder
1/4 tsp pepper
dash of cayenne pepper (optional)
Preheat the oven to 400F, so the beans won’t cool down too much after being put in.
Heat the oil in a dutch oven, and cook the diced onion over medium heat until medium brown (~10-15 minutes). Add the garlic, beans, the bay leaf, thyme, rosemary, 1/4 tsp pepper, and enough bean liquor / water to cover by 1/2″. Check seasoning (it should taste slightly under salty at this point). Bring all to a gentle simmer, and transfer to the hot oven (uncovered).
Stir together the tsp of salt, nutritional yeast, and one of the 1/4 tsp pepper in a large bowl. Add a dash of cayenne, if liked.
Cut the tofu into 3/4″ cubes or chipolata, pat dry with kitchen paper, and use your hands to toss the tofu gently with the seasoning mixture. (Defrosted tofu is particularly delicate.)
Spread the tofu out on a baking/cookie sheet which has been lined with baking parchment, and place in the oven for about 1/2-3/4 hour until starting to firm up around the edges. (This will depend on how wet your tofu is, and how big the chunks are.)
When the tofu is ready (firmed up on the outside and chewy), stir it into the beans, and continue cooking the beans in the oven until the sauce has finished thickening (a total cooking time of about an hour for the beans).
Serve hot with crusty GF bread, and warm fluffy blankets next to a roaring fire.
I was in the kitchen indulging in some tortilla making this morning (mainly because I was craving carbs), and I was turning one of them into a quesadilla, as I finished making the others, when it occurred to me that I should be able to turn the tortillas into individual thin crust pizzas, too, albeit in a slightly thicker and bigger format, and cooked a bit longer to get a crunchy crust.
One of the tortillas succumbed to my experiment, but it wasn’t ideal as I had no pizza sauce on hand, and the crust burnt at the edges, but it showed promise; I just had to thicken the crust at the edges so it didn’t burn so easily.
I had another go this afternoon, and the resulting pizzas were sturdy enough to hold in the hand, crispy around the edge of the crust, and chewy and tasty all over. They were also really quick to make once the pizza sauce and dairy free cheese were sorted. 20 – 30 minutes start to finish for 4 pizzas. During the process, I figured that I needed to prepare all the ingredients before I started putting the pizza together, as once I got started, it all happened quickly, and I didn’t have much time for slicing veggies. Note that I put the cheese under the veggies so that it would melt more easily, and I put the veggies on the very top of the pizza so that they would cook under the broiler/grill, and not get shielded by the cheese.
Dairy free cheese (home made or commercial), thinly sliced, or diced
Toppings (thickly sliced mushrooms, thinly sliced red onion, black olives, raw garlic slices, halved fresh baby tomatoes, pineapple chunks, soy chorizo, oil preserved sun dried tomatoes, etc.)
Heat the pizza sauce, and set to one side.
Prepare all the toppings that you’re thinking of using, and also set to one side.
Place a pizza stone about 6″ underneath a hot broiler (grill), and preheat it.
Divide the dough into 4 evenly sized pieces.
On a well floured cutting board or work surface, roll one of the pieces of dough into a round about 10-12″ across, and then fold the edges back over so that the edge of the crust will be thicker than the rest of the pizza (to prevent burning, and make the crust look rounder).
Heat a dry cast iron pan on the stove on medium heat until hot, and place the rolled pizza dough onto the pan, with the folded over edges facing upwards. Cook for 2-3 minutes until the bottom of the crust is very slightly browned, and then flip the crust over, smear with pizza sauce, then the cheese, then the vegetable toppings, and then scoot the pizza onto the pizza stone for about 5-7 minutes while the veggies cook, the cheese melts, and the pizza crust browns around the edges.
While that pizza cooks under the broiler/grill, roll out the next pizza base and repeat the process.
 Sunshine! Spring is showing its face here in the Pacific NorthWest, and it is far too warm to resist the urge to make salad, today. I’ve made variations of this salad over the last year, but I’ve finally come to the conclusion that less is more when it comes to the dressing for this flag-bearer of a salad. Here we have the quintessential SouthWestern ingredients, all dressed in little more than the sharp floral flavors of fresh squeezed lime. If you love avocado the way we do, add an additional one (in cubes) to the salad before using the final one to decorate the top. I’ve not given a quantity for the chili, as different chilis have such a variation in heat, and different people have such a variation in desire for heat. You should add enough chili to just feel the heat, here, but not overpower all the other flavors. I’ve been using 1-3 tsp of minced, fresh/frozen Hatch chilis, which seems to be about right for my family.