Breakfast Casserole

Ah, comfort food. This is perfect breakfast food after a busy night. You can make it the day before, and feed 4 people with very little effort (and possibly a little toast) the next morning. It is warming and satisfying, but not at all heavy.

I designed this with sliced red potatoes (grated ones cooked to a mush), and with the tofu on top so it can bake and dry slightly. Don’t miss out on the lemon / lime juice that’s added to both the onion/pepper mix and the tofu; it gives an interesting zing, lifting the flavor and reducing the amount of salt required. The general consensus of opinion was that the vegan cheese was a good addition, too, and needed to be all over the surface, albeit in a thin layer. I baked it until both the cheese and the tofu were starting to brown.


2 tsp oil
1/4 large onion, cut into long strips
8 oz bell pepper flesh, diced or sliced
1/4 tsp lemon or lime juice
1/8 tsp salt
1 lbs red (waxy) potatoes, peeled and thinly sliced
1/4 tsp salt
1/8 tsp black pepper

1/2 cup cashew flour
14 oz firm tofu, drained
1 tsp salt
1/4 tsp black pepper
1 tbsp nutritional yeast
light dash of cayenne pepper
1 tsp Dijon mustard
1 tsp lemon/lime juice

6 baby tomatoes, for garnish
2 oz faux cheese, for garnish
Optionally serve with Ranchero sauce and toast.

Heat the oil in a large frying pan, and cook the onion and peppers over a medium heat, stirring occasionally, until softened, and the onions are starting to brown (~10 mins).

Line a 10 x 8″ casserole dish with parchment paper or  grease. Peel and finely slice the potatoes into the casserole dish, and toss with the 1/4 tsp salt, and 1/8 tsp ground black pepper. Distribute evenly over the bottom of the casserole.

Sprinkle 1/4 lemon or lime juice and 1/8 tsp of salt over the onions and peppers, stir, then spread evenly over the potato.

Combine the remaining ingredients (except garnish), together in a large mixing bowl, and mash thoroughly with a pastry wire (or the back of a sturdy fork) until no large lumps remain, or pulse in a food processor, but do not puree.

Spread evenly over the onion and pepper layer.

Press the tomato and cheese garnish into the top of the tofu layer.

Bake in the middle of the oven, at 400F for 30-35 minutes.

Check the potatoes are completely cooked by sticking a fork into the middle of the dish, if still not soft, cook for another 10 minutes.

Serve warm rather than hot, optionally with Ranchero Sauce and almond bread.

Gruyere Style Cheese Spread (and Pasta Sauce)

I had a flurry of enthusiasm for making faux cheese last week. My girls had reminded me that they liked the faux cheddar that I sometimes make (and not often enough, allegedly), and I’ve had a draft recipe for an appetizer requiring feta for about a year now, just waiting for me to figure the recipe for the feta before I post it. I’ve just about developed something that I like, but in the meantime, I had a go at something to replace Gruyere.

Pasta with Marinated Artichokes and Gruyere Sauce

A rich and delectable dish for entertaining. Pasta with marinated artichokes and rich ‘gruyere’ sauce (skip the cooking stage for the cheese).

The initial batch I made was with all water (too bland), so the second batch was made with all wine (too strongly flavored), but the next batch made with 1/2 water and 1/2 wine was great. I didn’t get as far as adjusting the texture to firm it up, as I couldn’t think of a use that I’d have for Gruyere where a spread wouldn’t work (and some where soft was preferable).

Gruyere cheez spread

GF baguette loaded up with vegan Gruyere cheese spread, cooked until thickened to a paste.

Like Gruyere, this is a moderately strong tasting cheese, and the initial flavor is very similar to the dairy variety. The aftertaste, however, has a bit of a tang due to the wine that isn’t present in regular Gruyere, but that can be driven off, to a certain extent, by cooking it. As an erstwhile lover of cheese fondue, I have to admit to liking the tang, and I’m not in a hurry to get rid of it!

Daughter #2 consumed quite a quantity of this stuff on crackers, so it’s been put through its paces! Personally, I like it on pasta. About 1 tbsp of cheese per ounce of dried pasta, stirred into the drained, cooked pasta for an almost instant supper. If you figure on any other ways to use this, do let me know.

8 oz (2 scant cups) blanched almonds
1 tbsp nutritional yeast
1/2 cup dry white wine (I used a chardonnay)
1 tbsp dark colored miso (I used Sweet Tasting Brown Rice Miso)
1/2 tsp salt
1/4 cup (4 tbsp) melted coconut oil

Put the almonds and dry white wine in a blender, along with 1/2 cup (4 fl oz) water, and leave to soak for at least a couple of hours.
Add remaining ingredients, and blend until completely smooth. This might take a couple of minutes or so, and if your blender can’t handle such a dry mixture, add a tablespoon or two of water, which you can then cook off.

DSC_0014

Texture of cooked cheese.

If your mixture is a bit thin, scrape it into a small saucepan, and heat, stirring frequently until the mixture turns stiff like cream cheese.

Adjust flavoring if necessary.

Store, covered, in the refrigerator.


Black Eyed Pea Goulash

Over the last few years, I’ve strayed somewhat from the beany stews that I so loved when I was first learning to cook. Could it be that I see them as unsophisticated? Certainly their image is somewhat austere, and they can seem unexciting, and yet (for some reason or another), they are warming, comforting, homey, reassuring, kind to my tummy.

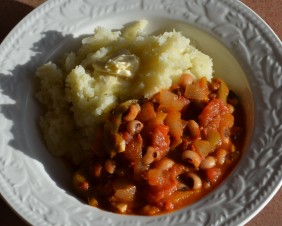
Black Eyed Pea Goulash

Black Eyed Pea Goulash with Garlic Mashed Potatoes

It doesn’t hurt that they’re economical and healthy, too. I wanted to make Boston Baked Beans for dinner this evening, but found I’d run out of haricot beans, and there was this packet of black eyed peas sitting in the dried bean draw waiting to be tried. In a rather bad mix of enthusiasm and disorganization, I put the beans on to soak, and then headed for my copy of Rose Elliot’s The Bean Book, which I’ve had since the mid 80’s and is now festooned with annotations and post-it notes, and has lost much of its glue, so is falling apart and has to be treated with respect in what is definitely the autumn of its life.

Anyway, I made the Beany Goulash, with my inevitable tweaks (more garlic, less oil, sun-dried tomatoes instead of puree … that sort of thing), served it up with garlic mashed potatoes, and watched while both of my girls cleared their plates, and told me I should make this more frequently. So much for austere and uninspiring. I shall make this more often. It will probably surface every couple of weeks on a weekday evening, warming tummies, and not requiring a whole lot of my attention.

8 oz dried black eyed peas/beans
2 tsp olive oil
1 large onion, peeled and diced
6 cloves garlic, finely chopped
16 oz (4 cups) green/red/yellow pepper strips (frozen works fine)
28 oz canned, chopped tomatoes in juice
4 oz (1/2 cup) sun dried tomatoes in olive oil, drained and minced
1 tbsp paprika
1 tsp salt
1/2 tsp ground black pepper
1-2 tbsp sugar (white or brown)

Pick the black eyed peas over for debris, rinse, and cover with plenty of water before leaving to soak over night.

Drain the peas, rinse once or twice, then cover with fresh water, bring to a simmer, and cook until the beans are soft but not falling apart (~30-40 minutes stove-top, or just bring up to pressure in a pressure cooker, then remove from the heat and allow to cool naturally).

Heat the oil in a large saucepan, and gently fry the onion for about 10 minutes until it is soft and translucent.

Add the garlic and pepper strips, and carry on frying and stirring for 5 minutes.

Drain the beans. Stir all ingredients together, and allow the stew to simmer gently for 30-40 minutes, stirring occasionally, until the surface turns a little darker, and the oil separates and rises to the surface, and the sauce has thickened.

Check seasoning before serving, and eat with a clear conscience.

By the way, if you want to make garlic mashed potatoes: peel, dice, and boil 4 baking potatoes (~2 lbs) until soft but not disintegrating. Mince 6 cloves of garlic and warm through in 2 tbsp vegan margarine (I like Earth Balance). Once the potatoes are cooked, roughly drain them, add the garlicky margarine and 1 tsp salt, then mash thoroughly with a potato masher. Check seasoning before serving.

Silky Smooth Dairy Free Rum and Raisin Ice ‘Cream’

This recipe is simplicity itself. Rich, creamy, and not too sweet, with little pockets of intense raisin/rum flavor. It includes cashews and alcohol, both of which disrupt the formation of ice crystals while the mixture is freezing, and so help to make the ice-cream smooth.

Rum and raisin ice cream (vegan)

5 oz (1 cup) raisins
1/2 cup dark rum
1 cup raw cashews
1/2 cup maple syrup

Soak the raisins in the rum for at least 1/2 hour, turning them through once in a while.

Put 8 fl oz (1 cup) water and the cashews into a high speed blender, and process until completely smooth.

Transfer the cashew mixture to a saucepan with all the remaining ingredients, use another 8 fl oz (1 cup) of water to rinse out the blender into the saucepan, and bring to a simmer until thickened, stirring continuously as it starts to boil.

Allow to cool, then pour into a freezer-proof container and freeze for approximately 4 hours, stirring every hour or so.

At this point, the ice-cream is still soft enough to serve. If it is left for longer in the freezer and gets too hard, you might want to allow it to defrost slightly in the fridge for 1/2 hour before serving.

For a variation on a theme, make Prune and Brandy ice-cream by substituting 5 oz prunes for the raisins, and brandy for the rum. Blend the prunes and brandy with the cashews.

Pineapple and Mango Guacamole

Pineapple GuacamoleA couple of weeks ago, we had a storm which brought down a whole heap of avocados off the trees, and once avocados are off the trees they start to ripen which means that I’ve had to think of ways to have the whole family eating plenty of them in a hurry. None of us has got bored of the Mediterranean Guacamole, yet, but I did run out of tomatoes yesterday, and so hunted around for other avocado recipes. I found loads of recipes on the Calavo website, but many of them included cream or meat, so I took some ideas and played with them, until this variation on a theme popped out: an interesting mixture of mildly hot and sweet, all tempered by rich avocado. Note that the amount of chili added depends on how hot your chili is. Add enough so you can just taste the heat.

1/2 cup pineapple pieces (frozen & defrosted works fine)
1/2 cup mango pieces (frozen and defrosted works fine)
1 cups avocado flesh (~4 avocados)
1 tbsp minced jalapeno chili (or to taste)
2 tsp lemon/lime juice
1 tbsp minced onion

Chop (by hand or in a blender) the pineapple and mango pieces into small pieces.

Stir all the ingredients together with a metal spoon (start with 1/3 of the chili), chopping any large pieces of the avocado into small chunks with the side of the spoon.

Check seasoning (adding more chili as desired), and serve with corn tortilla chips, or wrapped in GF tortillas.

Pasta with Rich Tomato and Grilled Aubergine (Eggplant) Sauce

Pasta with aubergine sauceIf you have any love of aubergines (eggplant) at all, do try this. My husband loves aubergines, but the taste is easily lost in strong flavors. This tomato sauce is fairly simple, but it is pretty assertive. To help the aubergine hold its own in the sauce, I use plenty of it, and stir it into the tomatoes at the last minute before serving, so that the flavors remain distinct.

Serve hot with a light, chilled, Lambrusco.

Serves 4-6 with 12-16 oz GF pasta

1 large aubergine/eggplant
1/2 tsp salt
4 tbsp olive oil
1/2 large onion, diced
1 (28 oz) tin of diced tomatoes
2 cloves garlic, minced
6 basil leaves
1/4 cup sun dried tomatoes cured in oil, drained and chopped
2 tsp sugar (optional, for acidic tomatoes)
1 cup black olives, stoned and cut in half

Cut the aubergine into 1/4″ thick rounds, and cut any of those rounds which are too big for one mouthful into 1/2 or 1/4s.

Spread the slices out in a single layer on a couple of baking sheets.

Pour 1 1/2 tbsp olive oil into a cup, and use a pastry brush to brush the top side of the aubergine slices. Sprinkle with 1/4 tsp salt.

Grill for a couple of minutes under a high heat for about 2-3 minutes or until the slices are turning slightly brown.

Turn the slices over, and repeat.

Pour 1 tbsp olive oil into a large saucepan, and gently fry the onion until translucent.

Aubergine and tomato sauceAdd the garlic to the onion, then the tinned and sun-dried tomatoes, and the olives. Bring to a simmer, and cook for 15-20 minutes, or until the sauce has reduced and the tomato chunks have broken down.

Check seasoning, and add sugar if necessary.

Add the basil and aubergine, and warm through for 2 minutes. Serve with pasta and a chilled red Lambrusco.

Gluten Free, Dairy Free, Thin Crust Pizza

I was in the kitchen indulging in some tortilla making this morning (mainly because I was craving carbs), and I was turning one of them into a quesadilla, as I finished making the others, when it occurred to me that I should be able to turn the tortillas into individual thin crust pizzas, too, albeit in a slightly thicker and bigger format, and cooked a bit longer to get a crunchy crust.

Cooked thin crust pizza

One of the tortillas succumbed to my experiment, but it wasn’t ideal as I had no pizza sauce on hand, and the crust burnt at the edges, but it showed promise; I just had to thicken the crust at the edges so it didn’t burn so easily.

I had another go this afternoon, and the resulting pizzas were sturdy enough to hold in the hand, crispy around the edge of the crust, and chewy and tasty all over. They were also really quick to make once the pizza sauce and dairy free cheese were sorted. 20 – 30 minutes start to finish for 4 pizzas. During the process, I figured that I needed to prepare all the ingredients before I started putting the pizza together, as once I got started, it all happened quickly, and I didn’t have much time for slicing veggies. Note that I put the cheese under the veggies so that it would melt more easily, and I put the veggies on the very top of the pizza so that they would cook under the broiler/grill, and not get shielded by the cheese.

Serves 4-6

  • 1 batch of amaranth, all purpose, or quinoa/bean flour dough
  • Pizza sauce (Herb and Garlic pizza sauce, Veganesca, Ratatouille, Ranchero sauce, or your favorite)
  • Dairy free cheese (home made or commercial), thinly sliced, or diced
  • Toppings (thickly sliced mushrooms, thinly sliced red onion, black olives, raw garlic slices, halved fresh baby tomatoes, pineapple chunks, soy chorizo, oil preserved sun dried tomatoes, etc.)

Heat the pizza sauce, and set to one side.

Prepare all the toppings that you’re thinking of using, and also set to one side.

Place a pizza stone about 6″ underneath a hot broiler (grill), and preheat it.

Pizza doughDivide the dough into 4 evenly sized pieces.

On a well floured cutting board or work surface, roll one of the pieces of dough into a round about 10-12″ across, and then fold the edges back over so that the edge of the crust will be thicker than the rest of the pizza (to prevent burning, and make the crust look rounder).

Heat a dry cast iron pan on the stove on medium heat until hot, and place the rolled pizza dough onto the pan, with the folded over edges facing upwards. Cook for 2-3 minutes until the bottom of the crust is very slightly browned, and then flip the crust over, smear with pizza sauce, then the cheese, then the vegetable toppings, and then scoot the pizza onto the pizza stone for about 5-7 minutes while the veggies cook, the cheese melts, and the pizza crust browns around the edges.

While that pizza cooks under the broiler/grill, roll out the next pizza base and repeat the process.

Vegetable Juicing

Well, I got zapped good ‘n proper with gluten over the holiday period this year: the problems were too much eating out (I started to get complacent about re-confirming that my food was gluten and dairy free when it was delivered); and a waiter who sounded as if he was paying attention, but in retrospect really wasn’t. Not only did half my meal not appear until everyone else had nearly finished eating (that should have warned me), but the half that I took home (and confidently ate the next day) was most definitely not gluten free …. and you don’t want to know how I knew it wasn’t … and it’s now February, and I’m still itching!

Carrot, apple and ginger juice

Early morning freshly squeezed, carrot, apple, and ginger juice

It takes a few days to a couple of weeks for the worst of my symptoms to subside. I have found that my best bet to deal with this situation has been to juice only, on the worst days. To be honest, I’m not sure why I don’t juice more often. There’s something blissful about the almost instant satiety without the feeling of being stuffed, and the calm that ensues. I don’t generally count calories when I juice. I just drink when I want to, but the weight tends to slide off as I do. So, tell me: if I like the taste, and I like the way I feel when I juice, and my weight does good things when I do so, how come I only seem to do it when my tummy is in desperate need of a rest?

Answers please, on a post card …….

I can’t say that I usually follow any recipes for juicing. I wanted to share an idea here, rather than a recipe. However, because carrots are remarkably cheap, and because we have orange trees, my standard juice is basically loads of carrots (6 large ones), with a small orange and a diddy amount of fresh ginger. It’s not that I only drink this combination, but if I want a juice in a hurry, this is what I opt for.

Juicing veggies

Veggies for juicing …. if appearance bothers you, use green rather than black grapes.

There are loads of books and web-sites out there that do suggest combinations of vegetables to juice with associated benefits, and sometimes I try out their combinations, but quite often I will just juice what’s already available in my fridge or garden, and most of the time it is delicious. I have learnt to limit kale to a couple of handfuls, and celery to a single stalk per cup of juice I make, but carrots, cauliflower stems, broccoli stems, white cabbage, lettuce, fresh tomatoes, red/yellow peppers, cucumber (skinned), and zucchini/courgette I will use as much as I fancy. Generally, I add a small orange, 1/2 an apple, a handful of grapes, a persimmon, or a slice of fresh ginger, as available, but the dominant ingredients are (culinarily speaking) vegetables.

I have enjoyed The Juice Lady’s Turbo Diet by Cherie Calbom. She is very inspirational, though I do tend to feel there is a bit of pseudoscience stirred in for good measure.

I rather like this site (http://juicerecipes.com/build/), too, for its page where you can get a nutritional run down of the ingredients that you’re juicing. Juicing calories and nutrients tend to be less than those of the whole plant (as you’d expect), but it’s nice to know how much less, and if you do want to count calories, this is good information.

If you want to buy a juicer, I recommend this website which helped me chose which juicer to buy: http://www.discountjuicers.com/   They only sell kit that they have tested, and discuss the pros and cons of each one. They’ve also got good tables for helping you to compare different types and brands of juicer. I ended up buying a masticating juicer from them (this one, in fact: http://www.omegajuicers.com/juicers/masticating-juicers/juicer-8004.html … they don’t seem to sell DSC_0001it any more, though that was 3 years ago, and I still love it) which allows me to make almond/cashew flours and butters, and instant fruit sorbets (from frozen fruit) as well as juice. It also has fittings for making various pasta shapes, but I found a brand of GF pasta that I liked before I’d figured out a recipe for it, and didn’t get any further. I might have to look into that again …. but not until I’ve shifted this holiday weight!

Kale and edamame salad

O.K., I know that this is going to sound gruelingly virtuous, but this salad is actually really rather good. The kale has a fairly astonishing nutritional profile, but it can have a rather assertive flavor, too, so I wanted a dressing that would tame it somewhat. I experimented with various dressings (including orange mayonnaise!), but in the end fell back on my old reliable vinaigrette, and really that’s all that it needed.

DSC_0022

Kale, edamame, cranberry, and brussels sprout salad. Healthy, filling, and loaded with nutrients! A real tonic for the post-holiday season fallout.

Although the ingredients don’t look as if they make much salad, this is one of those strangely filling foods that demand time taken to eat. I munch on this and feel as if I’ve (temporarily) joined the ranks of those virtuous salad eaters that you see sitting outside cafes on a sunny lunch time, making one feel like a nutritional neanderthal with no willpower to resist <insert addictive food substance here>. However, I don’t feel unhappily virtuous when I eat it. Sliced brussels sprouts are surprisingly sweet and tasty, raw, and the cranberries give intermittent pockets of intensity against the generally green tasting background of the kale. The salad dressing moistens and brings it all together.

For a bit of variation (or if you’re a little wary of kale), substitute finely sliced white cabbage (the stuff used for making coleslaw) for half of the kale.

Serves 4 as a side salad

2 recipes of slightly sweetened vinaigrette
2 cups (16 fl oz) kale
10 brussels sprouts
8 oz edamame (fresh, shelled, soy beans)
1 cup (8 fl oz) dried cranberries

Use a sharp knife to strip the kale greenery off any stalks; discard the stalks, and finely slice the green.

Clean the sprouts, and slice.

Toss all ingredients together in a large salad bowl, and serve.

Haggis

Haggis, Neeps and Tatties

Vegan Haggis with Neeps and Tatties.

Gluten free and vegan haggis. I would think all three of those are weird to the mainstream eater! Haggis looks very much like a sausage overstuffed with cooked minced meat, or soy chorizo, so finely chop up all the ingredients. I chop mine by pulsing them in the food processor. I previously used mushroom powder to help with the meaty / umami flavor, as well as the fresh mushrooms which give a chewy texture, but updated the recipe to miss the dried mushroom which gave it a slightly stodgy texture. Authentic haggis contains quite a quantity of oats, and although I know that GF oats should be O.K. for my tummy, I remember feeling not so well after eating them, and haven’t given them another chance since. You could add them if you really wanted to.

The flavor of this is very satisfying. It is filling, and warming, lightly spiced, and savory. I did wonder whether I should throw a wee dram of whisky into the mixture, but I couldn’t quite bring myself to do that to single malt scotch. (Update: I tried some with a little whisky, and daughter #1 was not at all keen, so we’re leaving it out.) The texture of the filling is soft and hearty, and contrasts well with the chewy rice-paper covers. All served with gravy and mashed tatties or swedes: very homey and satisfying.

Make 12 individual haggis, enough for 6 folks.

2 tsp cooking oil
1 medium onion, peeled and finely chopped
1 large carrot, peeled and finely chopped
8 oz fresh mushrooms, finely chopped
2 cloves garlic, minced
1/2 cup (4 fl oz) dry red lentils, rinsed
20 fl oz / 2 1/2 cups water
1 tsp salt
1/4 tsp black pepper
1/2 tsp nutmeg
1/2 tsp ground coriander
1 tin or 10 oz drained, cooked, black or red beans
1 1/2 oz / 6 tbsp ground pecans
1 tbsp Braggs Amino Acids (or other GF soy sauce, for salt and color)
12 x 8” round rice papers for wrapping

Bubbling haggis

Heat the oil in a saucepan over medium heat, and sauté the onion and carrot for 5 minutes.

Mix in the mushrooms and garlic, and continue cooking 5 minutes, stirring occasionally.

Stir in the lentils, water, salt, pepper, nutmeg and ground coriander, and simmer gently, uncovered, until the lentils are no longer crunchy.

Add the remaining ingredients (except for the rice-paper wraps).

Stir, turn the heat down to low, and simmer gently until the haggis filling is a thick, spoon-able consistency.

Check that the lentils have fully softened, and if not, add another 4 floz of water and continue simmering.

Turn off the heat, cover, and put to one side while you compose the haggis parcels.

Cooked haggisSet up a frying pan wide enough to hold the rice papers, with 1/2” of water, heated until finger hot.

Place one rice paper in the hot water, holding it down with your fingers so it doesn’t curl up on itself. Allow the rice paper to soften for 20-30 seconds, until soft and pliant.

Transfer the rice paper to a plate; place 1/4 cup haggis mixture in a 2” by 1” sausage in the center, then fold the rice paper first over the short sides of the sausage filling, then roll the haggis up to complete the casing.

Put the haggis on a warmed plate to one side, covered with tin foil to keep warm, then repeat with the next rice paper, until all the mixture is used up.

Serve hot, with mashed potatoes and swede (neeps).

Burger Buns

Burger bunsYou may or may not know this. A nice little trick with bread involves knowing that high cooking temperatures will give a thicker, crunchier crust, and lower cooking temperatures result in a thinner, softer one. So, if you want your bread to have a soft almost non-existent crust, much like burger buns, then a lower cooking temperature is required.

I normally cook my almond brioche bread at a medium temperature (~360F/180C) to get a medium amount of crust. To get these soft, thin crusted baps, I drop the temperature to 320F/160C, though I suspect that lower would work, too. Additionally, I wet the surface of the dough before it goes in the oven, to delay the formation of the crust (due to the surface drying out) so that the dough can continue rising in the oven for a little longer. I happen to love the mild (but not non-existent) flavor, and soft, flexible texture of this almond brioche bread, but if you have a favorite GF bread mix, you can just try dropping the temperature to make burger buns.

This recipe makes 8-10 burger sized rolls

1 recipe Almond Brioche dough

Line a cookie/baking tray with parchment paper, and use a serving spoon to form 8-10 equal sized mounds. Spread the batter out with the back of the spoon into patties, 3/4″ high, by ~5″ diameter.

Now, use wet fingers in small circular motions to gently smooth the top and sides of the buns. Re-wet your fingers frequently. This will give a smoother external texture, as this dough doesn’t smooth out on its own very well.

Leave the rolls to rise for 30-40 minutes.

Put the tray into the middle of a cold oven covered lightly with parchment paper to prevent over browning, and turn on the oven to cook for 35 minutes at 320F.

When the rolls are lightly browned, and spring back when prodded, remove them from the oven, and cover with a clean kitchen towel while they cool, to help keep the crust soft.

Enjoy.

Orange, Cranberry, and Walnut Salad

California is in the clutches of a drought, even by our normal standards. Humidity levels have been down below 20% for ages, and temperatures are hovering around the 80’s (26-32C). We’ve had less than 1/3 of our normal rainy season precipitation ….. so we’re eating salads.

There’s something rather attractive about this leafy salad, speckled with gold and crimson fruit. It’s a good salad for warmer, late winter days, when oranges are fresh off the trees.

Orange, Cranberry, and Walnut Salad with black olive hummus.

Orange, Cranberry, and Walnut Salad with black olive hummus.

1 clove garlic, minced
3 tbsp olive oil
2 tbsp orange muscat champagne vinegar (or this homemade version)
1 tbsp maple syrup
2 – 3 oz baby lettuce leaves
2 oranges
1/2 cup cranberries
1/2 cup walnuts (lightly candied, if liked)

Vigorously beat together the garlic, olive oil, vinegar, and maple syrup with a fork to make an emulsion.

Wash and dry the lettuce, and put into a large bowl.

Peel the oranges, cut the flesh into dice, and mix with the cranberries and walnuts.

Add half the fruit/nuts to the lettuce with half of the dressing, and toss with hands or salad servers to combine.

Sprinkle the remainder of the fruit/nuts and dressing over the top, and serve immediately.

Pineapple and Mango Smoothie / Cocktail

Frozen Pineapple and Mango with rum.

Creamy frozen pineapple and mango with rum.

This recipe has just been requested by Madeleine of Nottingham in England, who came to stay with us during the summer, and appreciated this cold drink in the unaccustomed, California heat. That’s my excuse for posting a frozen smoothie recipe when the east of the US is experiencing the coldest weather it has had in a couple of decades …. though to be honest, here in California, we’re having mild summer weather, humidity levels down at 12%, and no rain. Again. This place is parched, so maybe a frozen drink would be a good idea right now.

This serves 2.

1 cup (8 fl oz) frozen pineapple chunks
1 cup (8 fl oz) frozen mango chunks
2 cups (16 fl oz) sweetened, non dairy milk (I use vanilla almond milk)
1 tbsp honey (optional) … or 2 tbsp Bacardi if this is destined for adults (also optional).

Place all ingredients in a blender, and blend on highest speed until smooth.

Hand out to all your kids (without the Bacardi) who won’t really realize they’re getting their day’s quota of fruit.

Orange and Ginger Steamed Pudding

Reminiscent of warm, sticky gingerbread, this pudding is definitely comfort food. Opinions in our household are split over whether to peel the decorative oranges before use, as they make eating the pudding a little more difficult, but add an interesting tang. Once you’ve collected all the ingredients together, putting the pudding together is a quick process, though steaming it still takes a bit of time, and the house does fill up with homey sweet gingery smells while it’s at it.

The marmalade I use for this is a fairly tart, tangy, homemade affair. If your marmalade is sweet, you may want to avoid adding the sugar as well.

OrangeAndGingerPudding

Gluten free, warm Orange and Ginger Steamed Pudding.

1 orange, thinly sliced for decoration
2 eggs
1/4 cup marmalade (optional, for topping)
1 1/2 oz margarine, plus extra for greasing pudding basin
1/2 cup apple sauce
1 tbsp lemon juice (optional)
8 oz blanched almond flour
4 oz tapioca flour
2 tsp baking powder
1 tsp baking soda
1/2 cup marmalade, for flavoring
1/4 cup sugar (see note, above)
1/2 tsp salt
1 1/2 tsp ground ginger
1 1/2 fl. oz. (3 tbsp) non-dairy milk, if needed

Grease the inside of a 2 pint pudding basin; line the bottom with a piece of parchment paper, and re-grease that again, too, to stop the pudding from sticking to it.

Arrange the slices of orange artistically around the bottom of the bowl, and (if using) pour the 1/4 cup of marmalade onto the orange slices.

Beat the two eggs in a food processor for 10 seconds.

Add the margarine to the egg, and beat for another 10 seconds.

Add the apple sauce, and beat that in too.

Add the remaining ingredients (except for the milk), and beat briefly until all has been incorporated. If the mixture seems at all dry, add the milk; it should be a thick batter.

Scrape the batter into the prepared pudding basin, and cover with a sheet of parchment paper, then a sheet of foil. Secure the lot with a piece of string such that steam is prevented from getting into the pudding, and a handle is formed for ease of removal from the steamer.

Using a steamer (or a large saucepan with a trivet or crossed forks in the bottom to prevent the pudding from scorching on the bottom of the pan) boil a pint or so of water (such that it doesn’t touch the bottom of the basin). When the water has reached boiling point, put the pudding in the steamer/saucepan, add a lid to stop the water from evaporating, turn the temperature down so the water maintains a gentle simmer, and cook the pudding for 1 1/2 hours. Check that there is still water in the pan every 1/2 hour or so, and if it’s low top up with boiling water.

Once the steaming time has passed, remove the pudding from the steamer and the parchment and foil lid, put a serving plate over the top of the pudding basin, and in one swift movement (using oven mitts) turn the pudding basin and plate over as one. The pudding should fall onto the plate, and you can use the edge of a table knife to lift the edge of the basin so you can remove it.

Cut into slices, and serve hot with custard, cashew cream, or soy ice-cream.

Orange Salad or Dipping Vinegar

A lot of my salad recipes call for Orange Muscat Champagne Vinegar as sold by Trader Joe’s. Unfortunately, much of the world is deprived of my favorite store, so I decided to mix up a more accessible alternative. I asked daughter #1 to taste test the two side by side (to make sure I wasn’t fooling myself that the mixture tasted great), and her reaction was “Wow!”

Orange Salad VinegarThe mixture is thicker than regular vinegar, but this is not a disadvantage when making salad dressings. The orange flavor is quite pronounced and fresher than the original, but the clean cutting properties of the vinegar are preserved. Although I figured this as an alternative to vinegar for salad dressings, it would work really well as a dip for bread cubes, too, much as you get balsamic vinegar and olive oil in fancy Italian restaurants … though you’d have to double or triple the recipe!

Makes about 2-3 tbsp of ‘vinegar’.

1 medium size orange, juiced
1 tbsp white salad vinegar (such as white balsamic)

Thick, reduced orange juice.

Thick, reduced, orange juice.

Boil up the orange juice in a small saucepan for about 5 minutes until reduced to about 2 tbsp in volume and thick enough to leave a trail when the spatula is dragged through it.

Allow to cool slightly, then stir in the white salad vinegar. Use within a day or two in salad dressings and such like.

Home Fried Potatoes

I rather figured that everyone in the US knew how to cook home fries, and felt that putting them on the blog was daft of me, despite the fact that they’re normally gluten free, and my kids love them. However, it would appear that I am wrong. An American friend of mine just asked for my recipe for them, and my daughter said she needed a recipe for when she left home (and yes, this is a repository of recipes for my girls), and they’re not so common in England anyway, so perhaps a recipe is needed! For the Brits: these are like mini, pan-fried, roast potatoes.

Homefries

Lightly browned breakfast potatoes (homefries). It’s easy to crisp them up further, but my daughter likes them a little softer.

Note: In my opinion, this is easiest to make if the surfaces of the potatoes are dry before they are fried. I will usually cook them as jacket/baked potatoes in the oven/microwave, then peel and cut into cubes before frying. Make sure the fat is good and hot before adding the potatoes in order to avoid having the potatoes soak up too much of it.

Another option is to peel and dice the potatoes, then simmer in salted water until just cooked, then drain and allow to cool slightly (and dry) before continuing to fry them. Obviously, left over potatoes work well here.

I did try cooking the potatoes from scratch with the onions and peppers, but the onions/peppers had a tendency to burn if cooked before as well as with the potatoes, or didn’t brown at all if added after the potatoes had crowded the pan.

Oh, and as an aside: if you ever find you have left overs, these are excellent thrown into creamy broccoli soup as lumpy bits after the soup has been blended.

1 lb potatoes, cooked and cubed (see note, above)
1 + 1 tbsp vegan margarine (Earth Balance) OR canola (rapeseed) oil
1/4 large onion, diced
1 cup (8 oz) red/orange/yellow pepper strips
1/4 tsp salt, or to taste
1/8 tsp ground black pepper, or to taste
paprika/cayenne pepper (optional)

Warm the first half of the fat in a large frying pan.

Cook the onion and red/orange/yellow pepper strips in the fat until they’re soft and starting to brown. Remove from the pan, and put to one side.

Add the remainder of the fat to the pan, and once it is hot, add the potatoes. Keep them moving around with a metal spatula/fish slice, to reduce sticking, scraping the bottom of the pan as necessary (those crispy bits are tasty, but also stop the potato cubes from browning further, if not scraped off).

Fry until they start to brown on all sides (this will be quite quick, if the surface of the potatoes is dry and the fat is hot). Add the onion and peppers back into the hot pan to reheat, sprinkle salt and pepper (and paprika or cayenne pepper, if liked) over the vegetables, and serve hot for breakfast, with scrambled tofu and some ranchero sauce (for example).

Trifle

TrifleThis dish is well suited for using up left over gluten free cake that has started to go a bit stale. Don’t assume that means it is not suitable for company! It just allows the cake to absorb the fruit and wine flavors better. I serve individual servings in wine glasses, so the pretty layers are visible while the dish is still pristine, but for family fare, you can use a single larger bowl, and dish up at the table.

I’ve given a range of marsala/sherry to add to the fruit; use the greater amount if your cake is particularly dry. The liquid from the fruit/sherry is absorbed by the cake. I’ve also used left over steamed pudding for the cake layer, and that was also successful.

The custard layer I use is made with soy milk (not soy milk and water), as this is a particularly rich dairy free milk, which goes well with the sharp fruit layer.

Serves 6 – 10

8 oz frozen wild blueberries
12 oz – 16oz chunky (not smooth) apple sauce
1/4 cup marmalade
2-4 tbsp sweet marsala wine or sherry
2 pints very thick vanilla custard (home made or Birds) – still hot to help it make smooth layers
GF Vanilla Almond Cake (1/2 recipe, if available)

Mix the blueberries, apple sauce, marmalade, and marsala/sherry together in a mixing bowl. Check for sweetness levels, and adjust if necessary.

If the cake is at all dry, make sure the fruit layer is juicy so the cake will be well softened.

Break the cake into chunks, and make a layer about an inch thick in the bottom of your serving bowl(s).

Put a similarly thick layer of fruit on top of the cake.

Carefully pour a final layer of hot custard to a similar depth, over the fruit.

Put the serving container(s) in the refrigerator to chill for at least half an hour before serving.

Custard (American: Pudding)

That word ‘pudding’ causes a whole heap of confusion to Brits in the USA. Just so as we’re clear, in the USA, the word ‘pudding’ appears to denote what the Brits refer to as custard, which is a pretty specific, vanilla flavored, cornstarch or egg thickened, sweet sauce for serving with apple pie/crumble/trifle or even on its own as a private, pretty gratuitous dessert. For my American friends: the word pudding is another word for dessert in England. I have lived in the States for about 15 years now, and have picked up a good many habits (verbal and physical) from the locals, but I cannot bring myself to think of custard as ‘pudding’!

Trifle

Trifle topped with home-made, uncolored custard.

Now, if you happen to live in the UK, this recipe is going to be pretty superfluous, since Birds Custard is universally available, even in corner shops and petrol station stores. As someone who doesn’t tend to eat dessert (even saying the word adds another inch to my waist), I can’t say I’ve actually looked for custard here in the USA, but the familiar package does leap out at me when I’m in stores that cater for the local British contingent, so we generally have some in stock. Not always, though! So, if you’re caught short with no commercially prepared custard powder (social faux pas in our household), or you happen to live in some part of the USA which doesn’t have a strong British presence, this could be useful.

The recipe below describes adding boiling milk to the starch and flavorings. Although it sounds illogical, the texture doesn’t seem quite right if you just put all the ingredients in the pan and bring it up to the boil. Adding boiling milk to the corn starch really does seem to be the right way to do this. The type of starch makes quite a difference here, too. I once tried making custard with tapioca starch (because I was out of corn starch), but no-one could get past the gelatinous, mucus-like texture, and I ended up putting it on the compost. Potato starch is just about acceptable, in a pinch.

Bananas and Custard

Bananas and Custard: a favorite from my childhood. This amount of custard (with 2 ripe bananas) is enough for 2 servings. Slice the bananas into 2 individual bowls, pour the custard evenly between the bowls, and chill before eating.

The 4 tbsp of corn starch makes a good, thick custard suitable for trifles as well as serving with pies and steamed puddings. If you prefer your custard to pour more easily, though, reduce to 3 tbsp.

As yet, I don’t use food coloring in my custard. I have tried blending a medium sized, cooked carrot into the mixture, but that produced a subtle pink custard. I know some folks will want to use turmeric, but I haven’t tried that yet, primarily because I’m not bothered by cream colored custard. I’ll update the blog once I’ve tried that.

And lastly, a note about the non-dairy milk: rice milk doesn’t work here. I know this sounds daft, but I just can’t get the custard to thicken using rice milk. I suspect that rice milk boils at a lower temperature than the cornstarch thickens at, whereas almond milk and soy milk work beautifully. The soy milk makes for a very rich sauce, however, so unless I’m making trifle, our preference is for almond milk, or 1/2 soy and 1/2 water. Plain or vanilla flavored work equally well.

16 fl oz non dairy milk (see note, above)
4 tbsp cornstarch
4 tbsp sugar
1 1/2 tsp vanilla essence
3 drops yellow food coloring if required
pinch of salt

Put the milk in a stainless steel pan on the stove top to heat.

Put the remaining ingredients in a >1 pint jug, and add just enough of the cold milk (< 1/8 pint) to form a thick liquid when stirred smooth.

When the milk starts boiling hard, pour it swiftly into the jug, stirring vigorously as you do so, while the cornstarch thickens the milk. If necessary, return to the pan to reheat or to finish thickening, stirring constantly to avoid scorching.

Rich Fruit Cake / Christmas Cake

This is a pretty traditional rich fruit cake (lack of wheat, notwithstanding). Although the 6.5” tin looks as if the cake will be a bit small, by the time it has been covered with almond paste/marzipan and icing, it is big enough to serve 12-15 slices. I use a food processor to make mine as it’s easier to beat the eggs in, but you can do it by hand if you have a strong arm.

I made an experimental version of this a few weeks ago (sans any almond paste and icing), and decided that was a good recipe because it disappeared within 24 hours …. and there’s only 4 of us in our household. In actual fact, this second one is even better (less crumbly in the middle), probably because I knew how long I wanted to cook it for without opening the oven periodically to stick the poor thing with cocktail sticks to check how it was doing.

Cut cake

Rich Fruit Cake, minus the snowman and snowballs. Comfortingly traditional for Christmas.

6 oz seedless raisins
9 oz other mixed dried fruit (e.g. cranberries, blueberries, cherries)
3 oz chopped walnuts or pecans
3 tbsp brandy
6oz margarine or shortening
6 oz soft brown sugar
3 eggs, lightly beaten
5 oz almond flour
3 oz corn starch
1 tsp cinnamon
1/2 tsp nutmeg
1/2 tsp ginger
3-4 tbsp additional brandy for spiking the cake once it is cold

Grease a 6.5” round cake pan.

Stir the dried fruit, nuts, and brandy together in a mixing bowl. Leave to soak, stirring occasionally.

Cream together the margarine and sugar (in a small food processor, if you have one).

Gradually beat in the eggs.

Stir the flours and spices into the dried fruit.

Stir the egg mixture into the fruit mixture. Mix well.

The mixture should now have a soft dropping consistency. Adjust with a few tablespoons of cider or brandy, if necessary.

Turn the mixture into the prepared cake tin.

Cover lightly with foil.

Bake at 300F for 2 hours.

Check the cake is done by sticking a cocktail stick into the middle and withdrawing it. Check for uncooked dough on the stick.

Allow the cake to get cold, before removing from the tin.

Prick the base with a needle and spoon the brandy over the top, especially around the edges where it tends to dry out a bit.

Eat as is, or cover with almond paste and icing.

Vegan Bailey’s Irish Cream

Oh, I’ve missed this! Before children came along, and the realization that I couldn’t consume dairy products had materialized, the ultimate self-indulgence for me was to spend an evening on my own, poring over a jigsaw puzzle, and drinking Bailey’s Irish Cream. A couple of years ago, friends brought a bottle over as part of a dinner party, and all I could do was look sadly at it. Not so any more. This version is thick and creamy, festive and comforting; just right for the on-coming holiday season. Note that this mixture thickens as it sits, and you should either drink it immediately (poured over ice-cubes to chill), or expect to have to adjust the consistency with water or brandy (your choice).

Cashew Bailey's

1 1/2 cup water
1 1/2 cup raw cashews
6 tbsp soft brown sugar
6 tbsp brandy

Put all ingredients into a blender (preferably high speed), and blend until smooth.

Chill in the fridge until required. Adjust consistency with water/brandy if required.

Serve in sherry glasses, or in a tumbler on the rocks.

Happy Holidays! 🙂

Creamy Pesto Sauce (Dairy Free)

This creamy pesto sauce is remarkably rich for being vegan, and almost all the fat comes from the pine nuts (there’s no added oil, as there is in regular pesto). This is much better for my poor tummy that can’t cope with high fat pesto. It’s also very quick to make, so I start making mine after putting the pasta water on to boil. The first time I made this version of the sauce, I blended the basil along with the other ingredients, and although it tasted good, it was a very vivid green, surprising enough for Halloween! I think the little flecks of basil look good in the sauce, which is why I now add the basil after the other ingredients have been thoroughly blended.

As a last note: don’t try using the basil stems in this dish. I was just a little too pleased with my new Vitamix a few months ago, and tried making pesto using stems and all. It didn’t work. I couldn’t get the stems to blend up smoothly, and ended up throwing the whole lot on the compost heap. I was not a happy bunny!

Creamy Pesto

This amount of sauce generously coats 8 oz of dried GF pasta.

1 cup pine nuts (or 2/3 cup almonds for a less rich version)
4 cloves garlic
1 tsp fresh lemon or lime juice
1/2 tsp salt
1 tbsp nutritional yeast
1 tsp chickpea or other light miso (optional)
20 large to medium, fresh basil leaves (no stems)

If you’re using this sauce for pasta, put the pasta on to boil, first.

Blend all ingredients (except basil) together with 1 cup of water in a blender until completely smooth.

Add the basil leaves, and blend until the sauce is pale green with flecks of basil.

Transfer to a saucepan (with cooked, drained, pasta, if using), and heat (stirring frequently) until thickened (~1 minute, if tossing with hot pasta).

Variation: Dice 2 medium sized tomatoes, and stir them into the sauce when thickening it. The fresh tomatoes are a nice counterpoint to the rich sauce.

Good Old Fashioned Rice Pudding

rice pudding in potI’m not really one for desserts. I have a few favorites, but I generally focus on savory foods. Here, however, is one of my (and my children’s) childhood favorites. Comfort food! This is not some fancy new combination of ingredients or cooking method, it’s a reminder of an old (tweaked) favorite, and a reference for my girls for when they leave home.

I have seen some recipes for this that produce a thin, sweet liquid with cooked rice pieces floating in it, just the way my father-in-law likes it, but this is a thick dessert the way my husband and girls like it (sorry, Alec), soothing, and not too sweet. I really like the taste of dried fruit here, whose flavor gently infuses the rice in the oven, but my husband prefers his plain, so take your pick.

6oz (1 cup) short grain rice (e.g. arborio)
3 pints rice milk
4oz (~1/2 cup) white sugar
1/2 cup dried fruit (e.g. dried cherries, cranberries, or raisins, optional)
1 oz (1/4 stick or 2 tbsp) vegan margarine (e.g. Earth Balance)
sprinkle of nutmeg/cinnamon (optional)

Put the rice and milk in an oven proof saucepan, and bring slowly to a simmer. Allow the rice to simmer gently, stirring occasionally to stop it from sticking to the bottom of the pan, until barely cooked (~15 mins total). At this point, the dish will still look very thin.

DSC_0006

Rice pudding served with tart, jarred, cherries.

Stir in the sugar (and dried fruit, if using), then dollop the margarine on the top to melt, sprinkle the top with nutmeg (if using), and put in the oven (towards the top to promote browning), uncovered, to cook slowly at 350F for 40-45 minutes, until the rice has absorbed the liquid, and a lightly browned skin has formed on the surface where the margarine melted.

Serve as is, or with stewed fruit.

Cabbage Pie

I’ve got to be kidding, right? Cabbage pie! It just so happens that I love this pie filling. It is good in a pastry cased pie (with accompanying chickpea or cashew gravy) or on its own as a pilaf. I’ve made it numerous times, just not recently, and not with GF pastry. I had a bit of a brainwave today, and adjusted my pastry recipe (now reflected on the updated page). This quantity makes enough for a single 8″ pie which feeds 4-6 folks.

Cabbage Pie

Gluten free cabbage pie with an almond pastry, garlicky green beans, and cashew gravy.

½ cup brown rice
1/4 + 1/4 tsp salt
2 + 2 tsps non-hydrogenated margarine
½ large onion, diced
8 oz white cabbage, shredded
8 oz mushrooms, thickly sliced
2 cloves garlic, minced
1/2 lb pastry – I like Tender Shortcrust Pastry made with almonds.
2 hard boiled eggs (or same volume of baked tofu)
1/4 tsp garlic powder
1/8 tsp onion powder
1/4 tsp fresh ground black pepper
1 – 2 tbsp Braggs Amino Acids (add the lesser amount, taste, and add more if you want it)
1 tsp lemon juice
1/4 cup chopped fresh coriander leaf (a couple of tbsp of chopped basil is different, but would also work)
salt, to taste

Cook the brown rice in twice its volume of water with 1/4 tsp of salt, either in a rice cooker, or in a covered saucepan, until soft all the way through, but not mushy. (~30-40 mins)

In a large frying pan, heat 2 tsps of the margarine, and fry the onion and cabbage until the onion is translucent. Tip this into a mixing bowl.

Now heat the remainder of the margarine in the frying pan, and cook the mushrooms on medium high heat. Sprinkle the mushrooms with 1/4 tsp salt to encourage them to release their juices, and when they do, add the garlic. Cook until the mushroom juices have evaporated. Do not allow the garlic to burn.

Tip the mushrooms and garlic into the bowl with the cabbage.

Stir in all other filling ingredients.

Taste, and adjust seasonings as desired.

Divide the pastry into 1/3 and 2/3. Roll out the larger part, and use to line the prepared pie plate/tin. (See note on rolling on pastry page.)

Fill with the filling; roll out the smaller part of the pastry and use it to top the pie, crimping the edges together.

Brush the surface with soy milk.

Place in the middle of the oven (lightly covered with parchment to prevent over browning), and cook for 30-35 minutes at 380F.

Mala Femmina

Autumn is hanging on by its fingernails here in California. We’re still having gloriously sunny days (with the odd showery one), and cool nights. It’s a very short season, being only about 4 – 6 weeks long, so I don’t think it will be more than another couple of weeks before I’ll be wanting to light the fire in the family room. However, as yet, it’s not too late to be eating salads. There’s nothing quite like a looming deadline for motivation!

This is a salad version of Pasta Puttanesca.

malfemina

Gluten free vegan pasta salad.

4 salad tomatoes
6 – 8 oz dry GF penne pasta
2 tbsp olive oil
2-3 tbsp finely chopped onion
2 medium sized cloves garlic, minced
3 tbsp capers, drained and roughly chopped
3/4 cup (~30) black olives, halved
~14 large basil leaves, torn to small shreds

Cook the pasta in plenty of  salted water according to packet instructions, until just cooked, but not fragile.

While the pasta is boiling, use a sharp knife to make a small gash in the skin of each of the tomatoes; use a slotted spoon to add the tomatoes to the boiling pasta water for about 60 seconds each, so that their skins start to peel back from the gash.

Remove the tomatoes from the boiling water with the slotted spoon, and peel off (and discard) the skins (which should pretty much slip off on their own).

Dice the tomato flesh.

When the pasta is cooked, drain it, and toss gently in a large bowl with the olive oil.

Add the remaining ingredients; stir to combine.

Check for salt, adjust if necessary. If your stomach can stand it, you can drizzle this with a little more olive oil.

Refrigerate until required (this can help the flavors develop), but no more than about an hour, as you don’t want the basil to go brown.

Caesar Salad Dressing

Making the most of the vestiges of the summer, I wanted to get at least one more salad related blog written before hotter dishes are required. Traditional Caesar salad contains both cheese and anchovies, neither of which I will eat. This version is slightly cheesy, and very garlicky. It is not for the faint of heart nor for delicately flavored salads …. by which I mean, I like it just served with crispy lettuce leaves (Romaine or cos) to dip in it, and both girls gave me the thumbs up, when I gave it to them on baked potato. If you are a lover of garlic as I am, you can use large cloves of garlic; if you have to be sociable the day after, try smaller cloves …. and if you want to drizzle the dressing over shredded lettuce and cubes of fried GF bread, slacken the dressing off with a tablespoon of rice milk first.

Ceasar Salad

1/2 cup mild flavored mayonnaise (Soy Vegan Mayonnaise is good)
1/4 tsp mild, light colored miso
1 tsp nutritional yeast
3 cloves garlic, finely minced
1/8 tsp pepper
1/4 tsp ground seaweed

Stir all ingredients together with a non-metal utensil, and use immediately.